Visit Japan Web is the official website where you fill out Japan’s immigration and customs forms before you land. At the airport, you show a QR code on your phone instead of handing over paper forms. It’s run by Japan’s Digital Agency, it’s free, and it’s optional. This guide walks you through it screen by screen, with screenshots taken on the official site in November 2026.
Visit Japan Web isn’t a visa. With a U.S. passport, you don’t need a visa for Japan for stays of up to 90 days1. For details, see Japan visa for U.S. citizens.
Key facts
- Where
- Only on vjw.digital.go.jp, the site of Japan’s Digital Agency. There’s no app to download; it works in the browser on your phone or computer.
- Cost
- Free. The Digital Agency says it never asks Visit Japan Web users to pay any fee.
- Required?
- No. It’s optional, but it speeds up immigration and customs. Japan Customs recommends declaring electronically through Visit Japan Web.
- What it covers
- Immigration (the arrival card for foreign visitors) and customs (your declaration of what you’re bringing in), both in one QR code.
- You need
- Your passport, your flight to Japan, the address and phone number of where you’re staying, and an email address. Plus a smartphone or tablet to show the QR code when you land.
- Languages
- English, Japanese, Chinese (simplified and traditional), Korean, Vietnamese, Thai, German, and French.
Watch out for look-alike sites and apps. The official portal is vjw.digital.go.jp (the address ends in .go.jp, a Japanese government domain). The Digital Agency has warned about a site that charged Visit Japan Web users an “application fee” and about suspicious apps such as “Visit Japan Web Info.” If a site or app asks you to pay, it isn’t the official service.
Do you need Visit Japan Web?
No, it’s not required. You can enter Japan without it, and you can also get the customs declaration form on the plane or at customs. But if you register before you fly, you just show a QR code at the immigration counter and again at customs, and you can use the electronic declaration gates. If you’re traveling with family, one account covers everyone (see Families).
It doesn’t replace the passport check. You still go through immigration in person. The State Department says visitors are fingerprinted and photographed on arrival (minors are exempt), and that your passport must be valid for your whole stay. You should also have proof of a return or onward ticket.
Before you start
Have these ready:
- Your passport.
- Your flight to Japan: the airline, the flight number, and the date you land.
- Where you’re staying: the postal code, address, and phone number of your hotel (or wherever you’re staying first).
- An email address you can check right away.
- Your phone, to show the QR code at the airport.
You can fill it out on a computer, but you need a smartphone or tablet to show the code when you arrive.
When to do it: The official site doesn’t give a deadline. Do it before you fly, once you know your flight and where you’re staying, so the code is ready when you land.
The process on video
In this Visania video, we walk through Visit Japan Web on the official site with a U.S. passport, from creating an account to getting the QR code. If the site has changed since then, follow what you see on screen.
Step 1: Create your account
The screenshots in this guide were taken on the official site on November 17, 2026, while we were recording our video for UK travelers, so the traveler in them, Sophie, has a British passport. With a U.S. passport, everything works the same, except that you choose United States as your nationality.
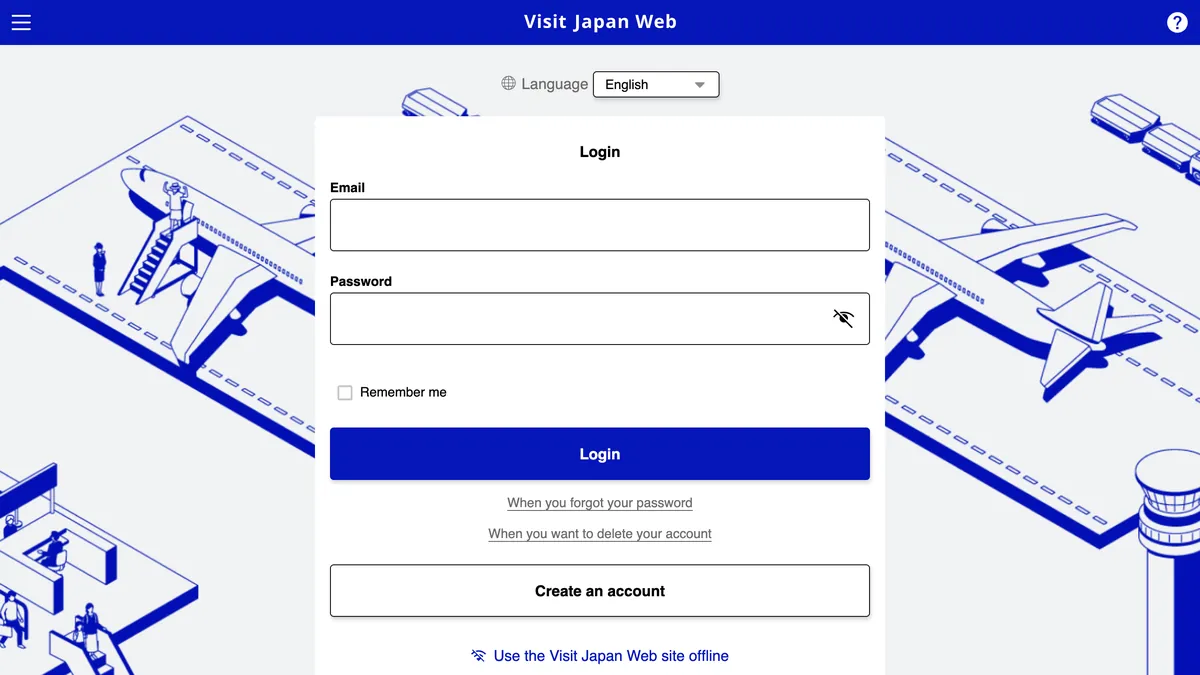
Go to vjw.digital.go.jp and choose English in the language menu if it isn’t already selected. Click Create an account (on the login page shown at the top of this guide), then check the two boxes to accept the Terms of Use and the Privacy Policy, and click Next.
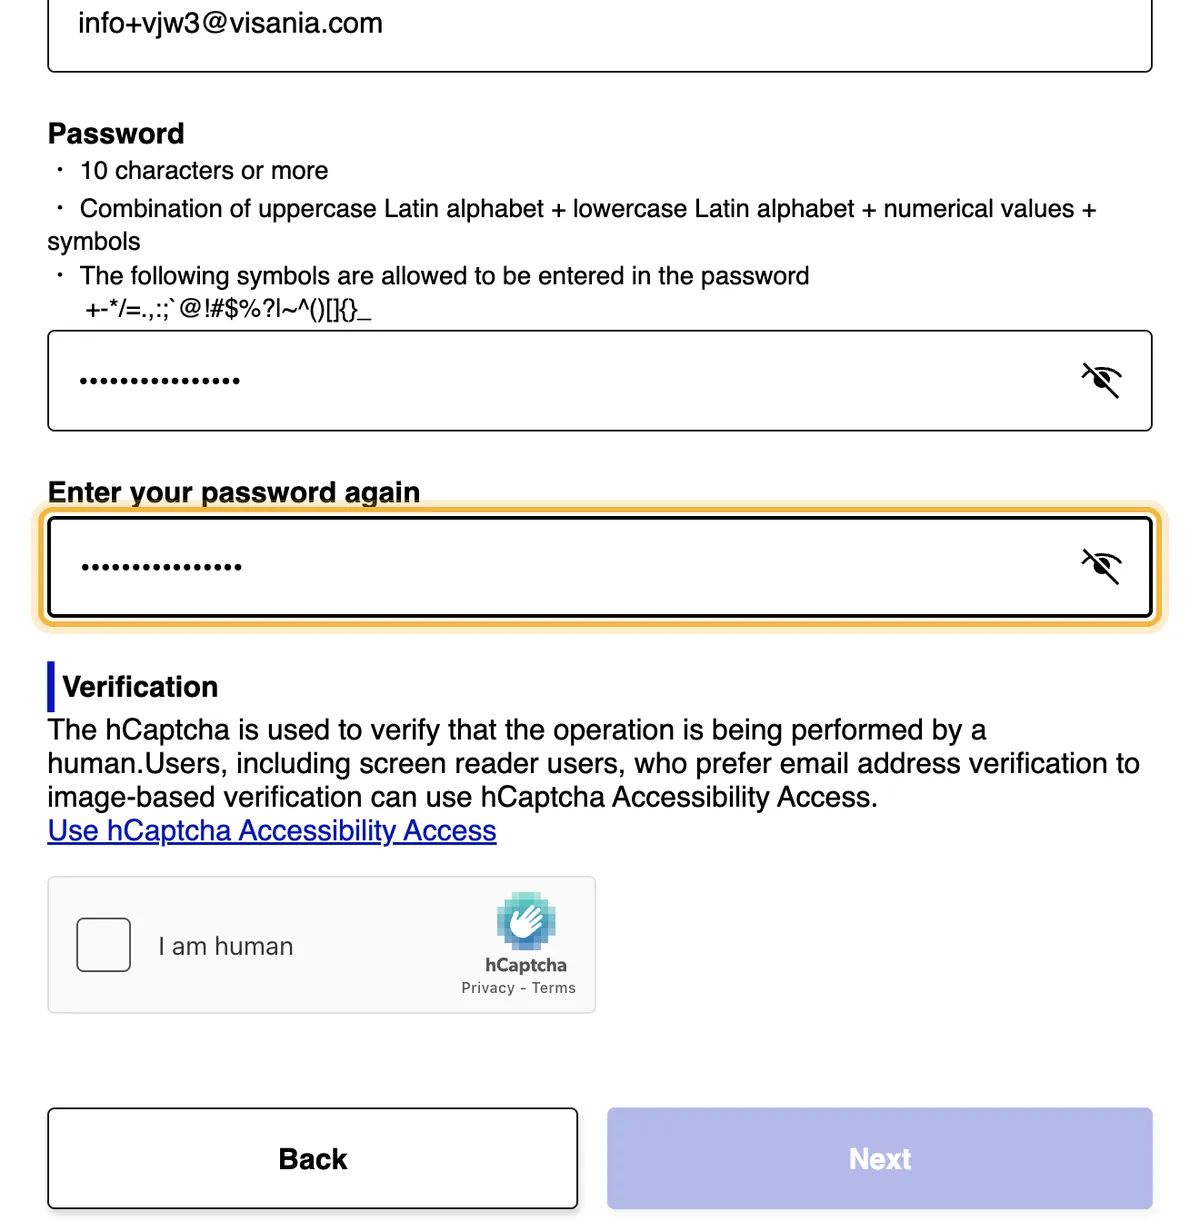
Enter your email address, then type a password twice. The password needs at least 10 characters, including uppercase and lowercase letters, numbers, and symbols. Next comes a “human” check (hCaptcha): check the box and solve the image puzzle if one appears. Click Next.
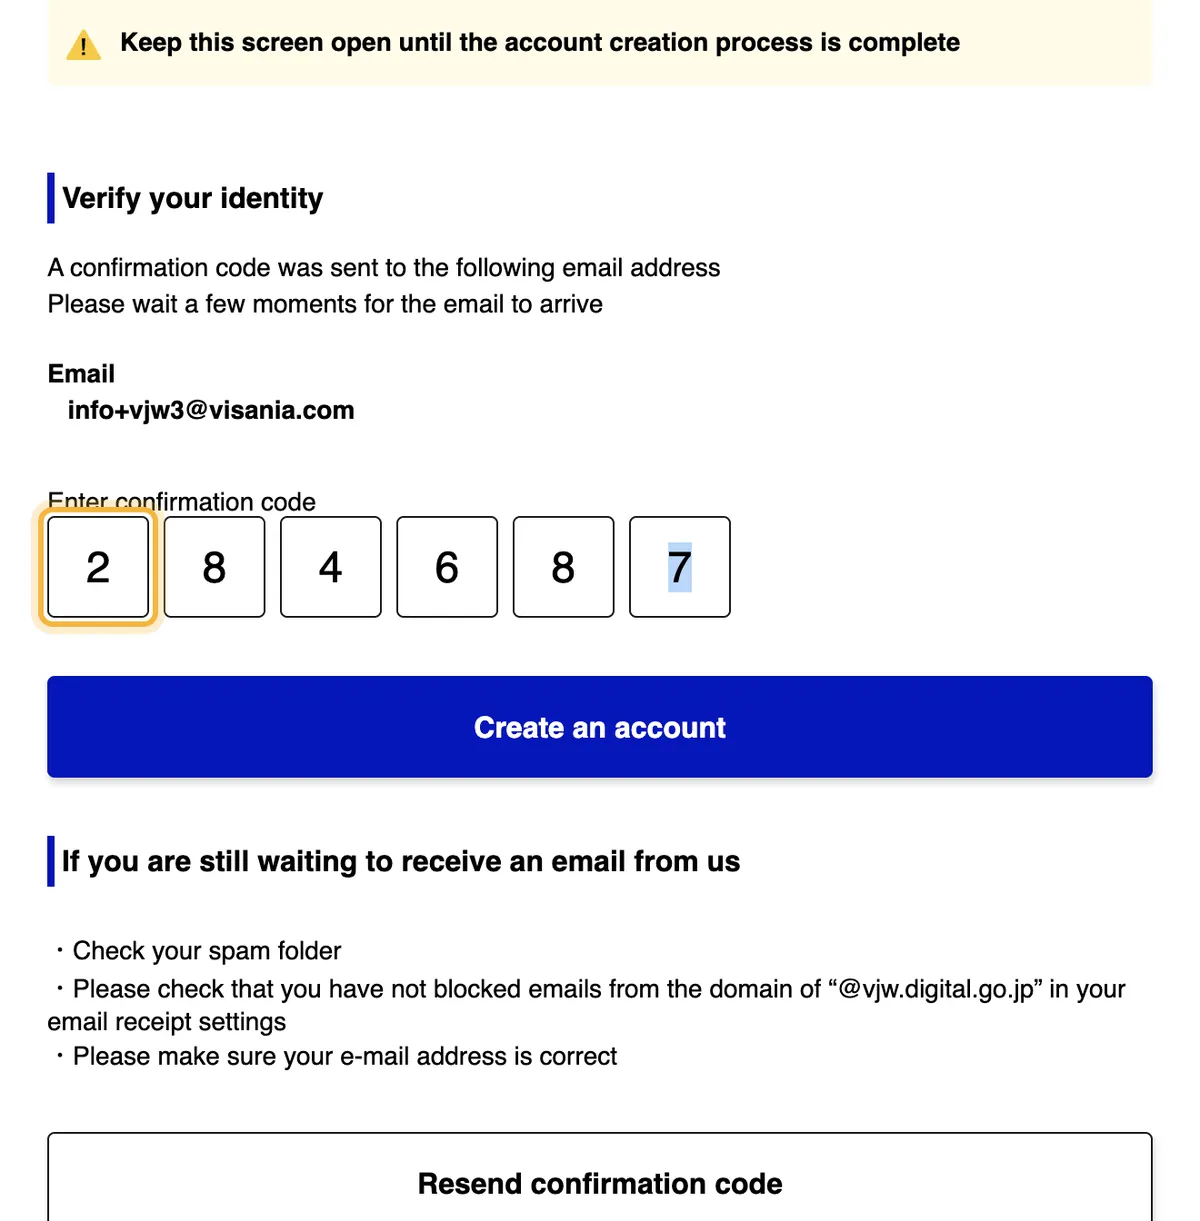
The site emails you a 6-digit confirmation code. Don’t close the page. The site warns you to keep it open until your account is created. Enter the code and click Create an account. If the email doesn’t arrive, check your spam folder and make sure you aren’t blocking emails from @vjw.digital.go.jp. There’s also a Resend confirmation code button.
Then log in with your email and password. The site asks whether you want multi-factor authentication with an authenticator app. It’s optional. If you don’t want it, answer No.
Step 2: Your details
On the home screen, click Your details. First, it asks whether you have a Japanese passport. Answer No. Then choose how to enter your passport:
- Scan with camera: your phone’s camera reads your passport (the site recommends this option).
- Enter information yourself: you type it in.
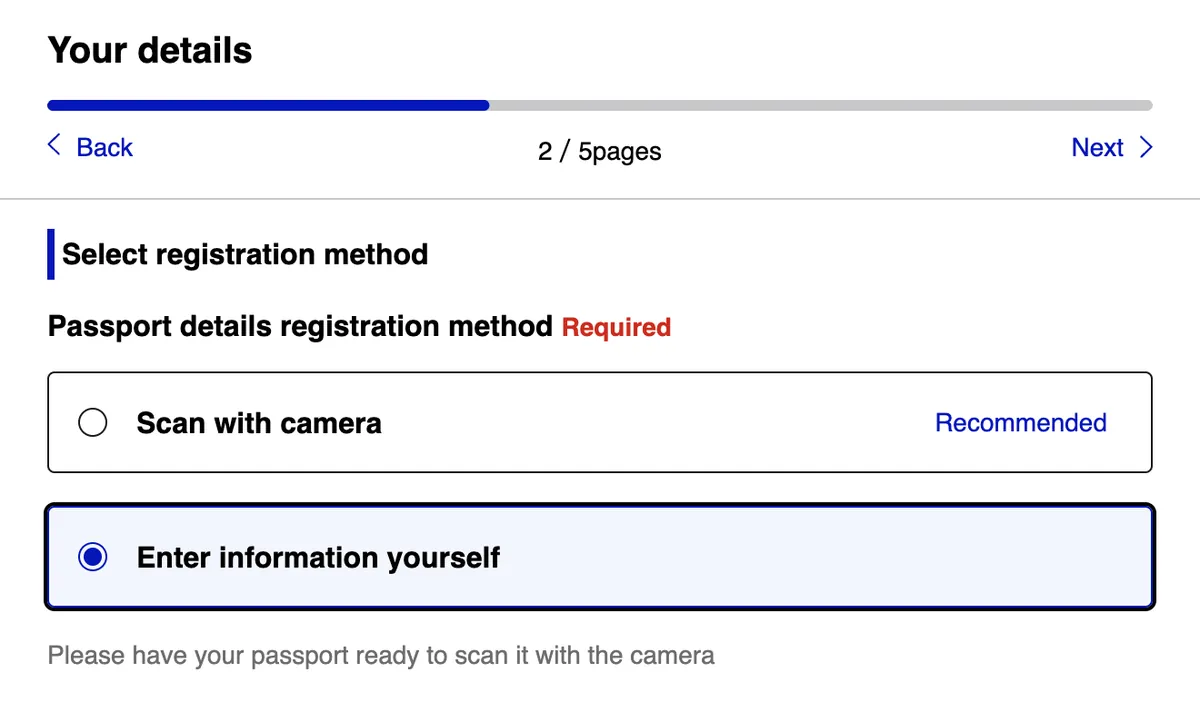
If you type it in, enter your passport number, your surname (last name), and your given name (first and middle names), exactly as they appear in your passport. For Nationality or citizenship, choose United States.
Then your date of birth and your passport’s date of expiry. Careful: Each date has three drop-down menus, in the order year, month, day, not month, day, year as in the U.S. So a birthday of August 22, 1986, is entered as 1986 · 8 · 22.
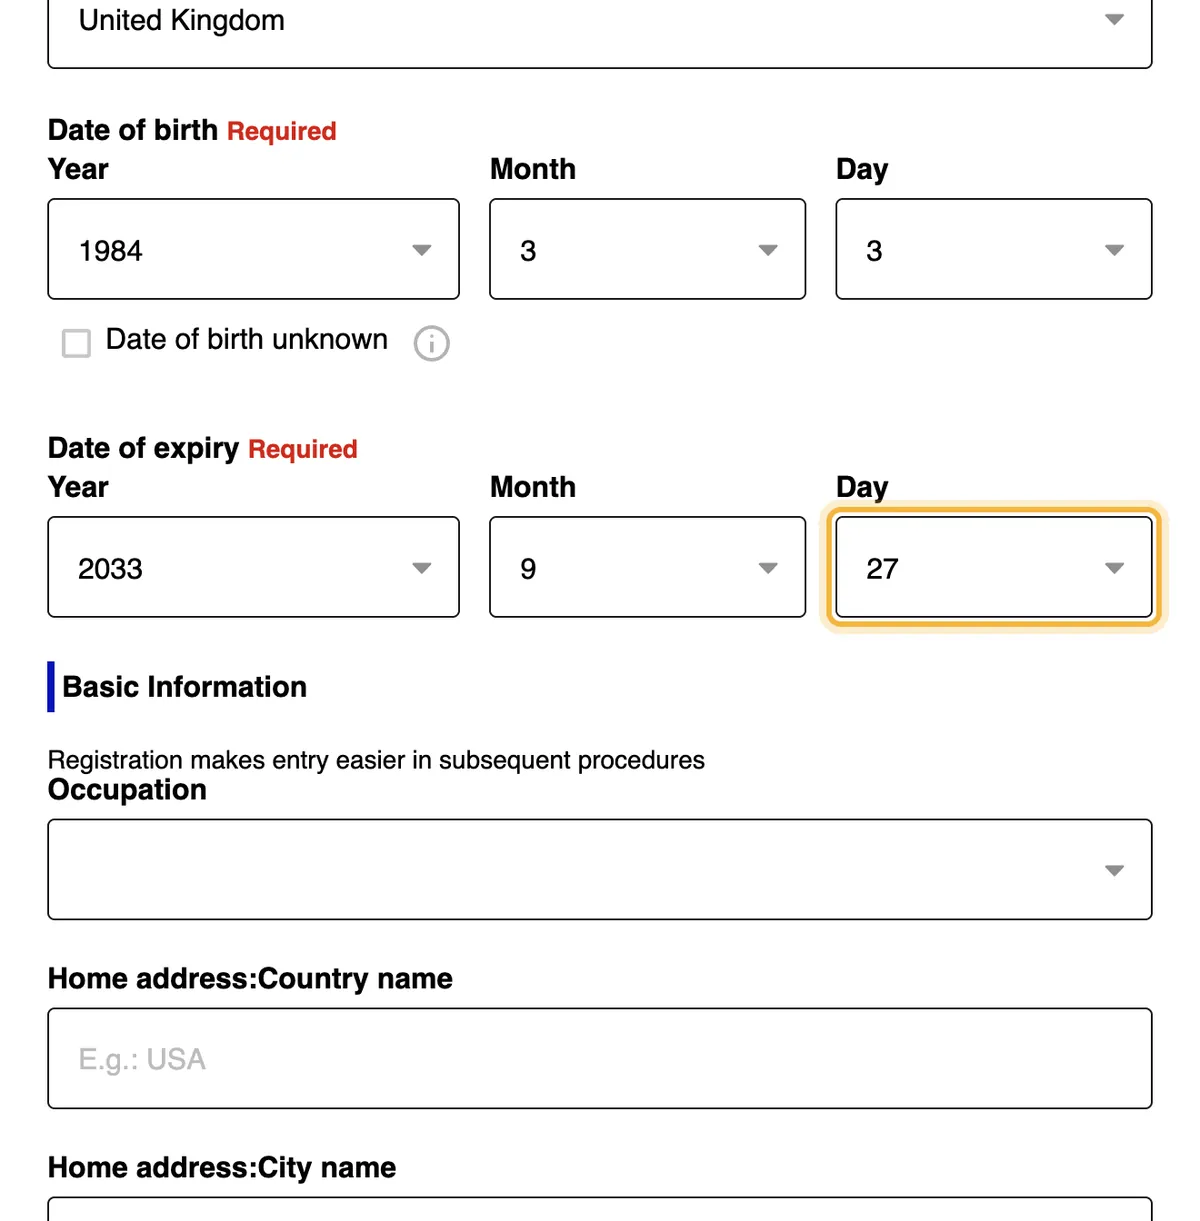
Basic Information is optional: your occupation (from a list) and the country and city where you live. It’s worth filling out, because it’s copied into your arrival card later and you’ll have less to type. Click Next, check your details, and click Register.
Visit Japan Web then offers to check whether you need a visa. With a U.S. passport, you don’t need one for a short trip. Answer No, and it just links you to the visa page of Japan’s Ministry of Foreign Affairs. Click Back to Home.
Step 3: Your trip
Click Register new planned entry/return. If it asks whether to copy details from a visa, choose to continue without copying.
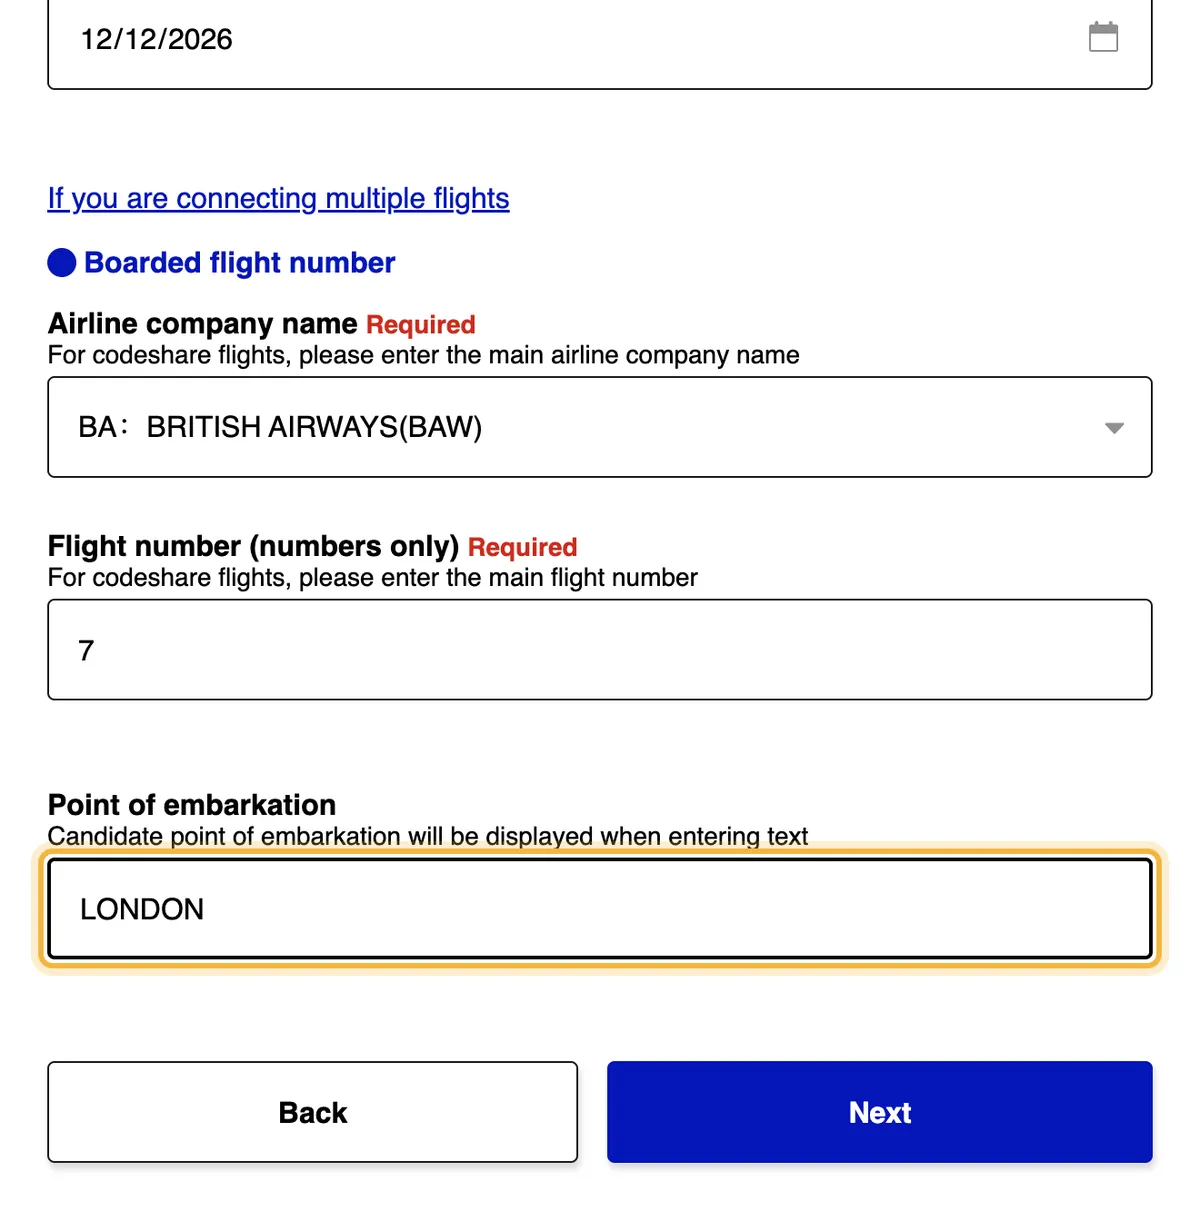
Arrival date. Enter the day you land in Japan, not the day you leave the U.S. Flights from the U.S. cross the International Date Line, so they usually arrive the day after they leave. The date field uses your browser’s date format: pick the date from the calendar so you don’t swap the month and the day.
Then your flight:
| Field | What to enter |
|---|---|
| Airline company name | Start typing and pick your airline from the list. For codeshare flights, the site asks for the main airline (the one operating the flight) |
| Flight number (numbers only) | Only the digits: NH105 is 105 |
| Point of embarkation | The airport where you board the flight to Japan. Start typing and pick it from the list |
If you have a connection, use the If you are connecting multiple flights link.
Step 4: Where you’re staying
Enter the postal code of the place you’re staying, without the hyphen (〒160-0021 is 1600021), and click Enter automatically using postal code. The prefecture and city fill in automatically. If they don’t, pick them from the lists.
Then add the rest of the address (the part after the city), the hotel name, and its phone number. The site says you don’t need hyphens. We entered the phone number in international format: 81 (Japan’s country code) and the number without its first 0, so 03-6833-1111 became 81368331111.
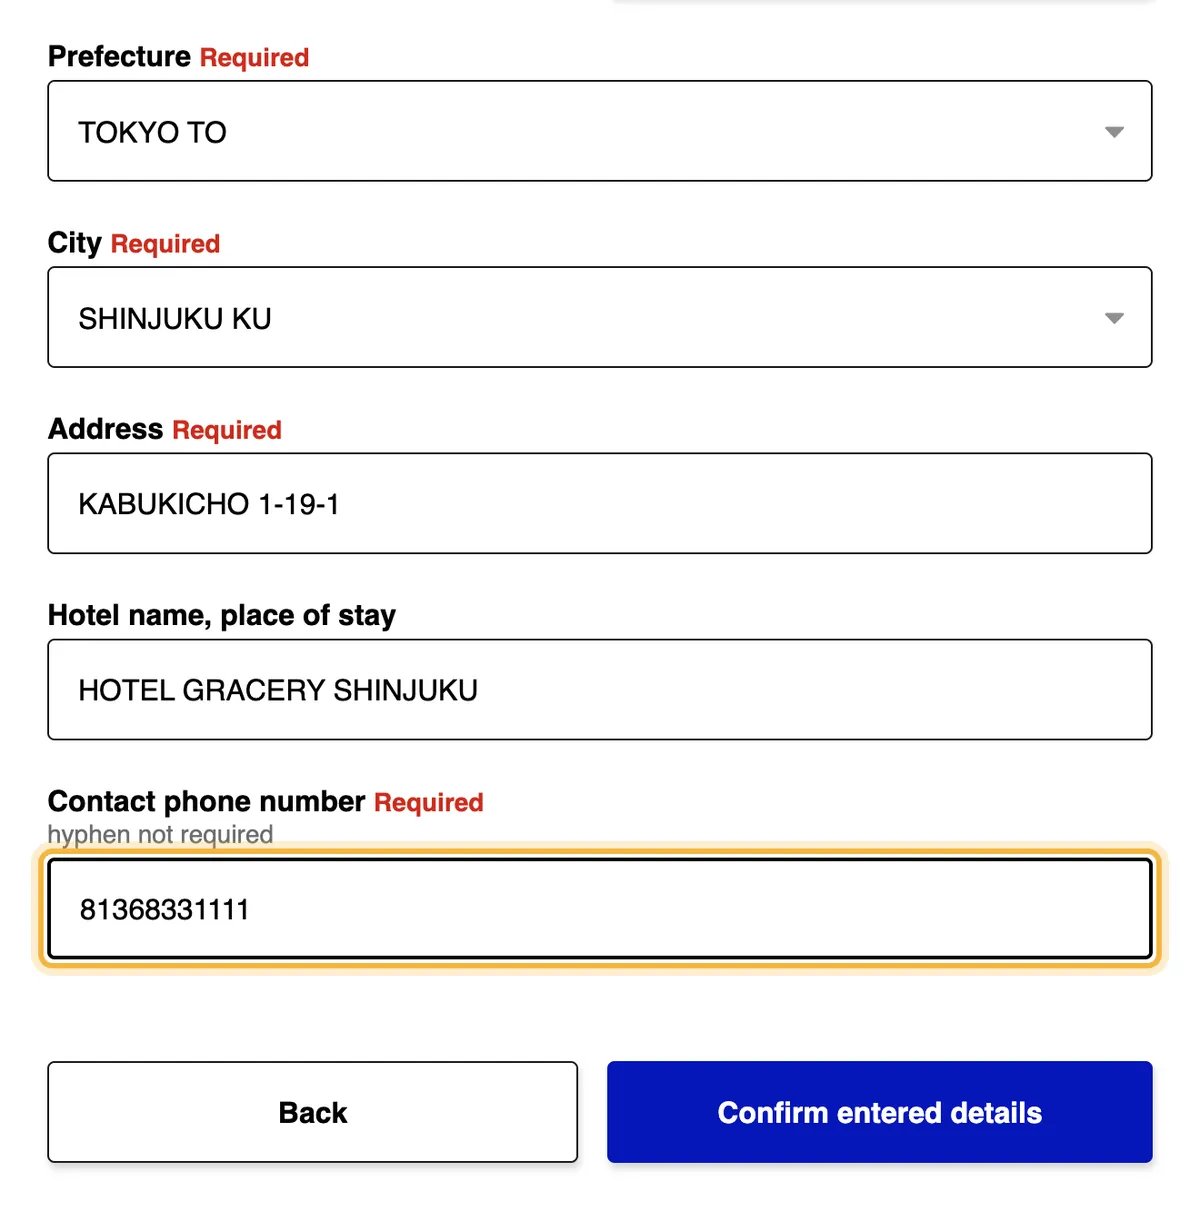
Click Confirm entered details, check everything, and click Register plan.
Step 5: Immigration
Click To entry/return procedure, then Immigration clearance and Customs declaration. A pop-up explains how the QR code is used. Click Next. Most of the arrival card is already filled in with the details you entered earlier (your occupation, address, flight, and hotel). Check it and continue.
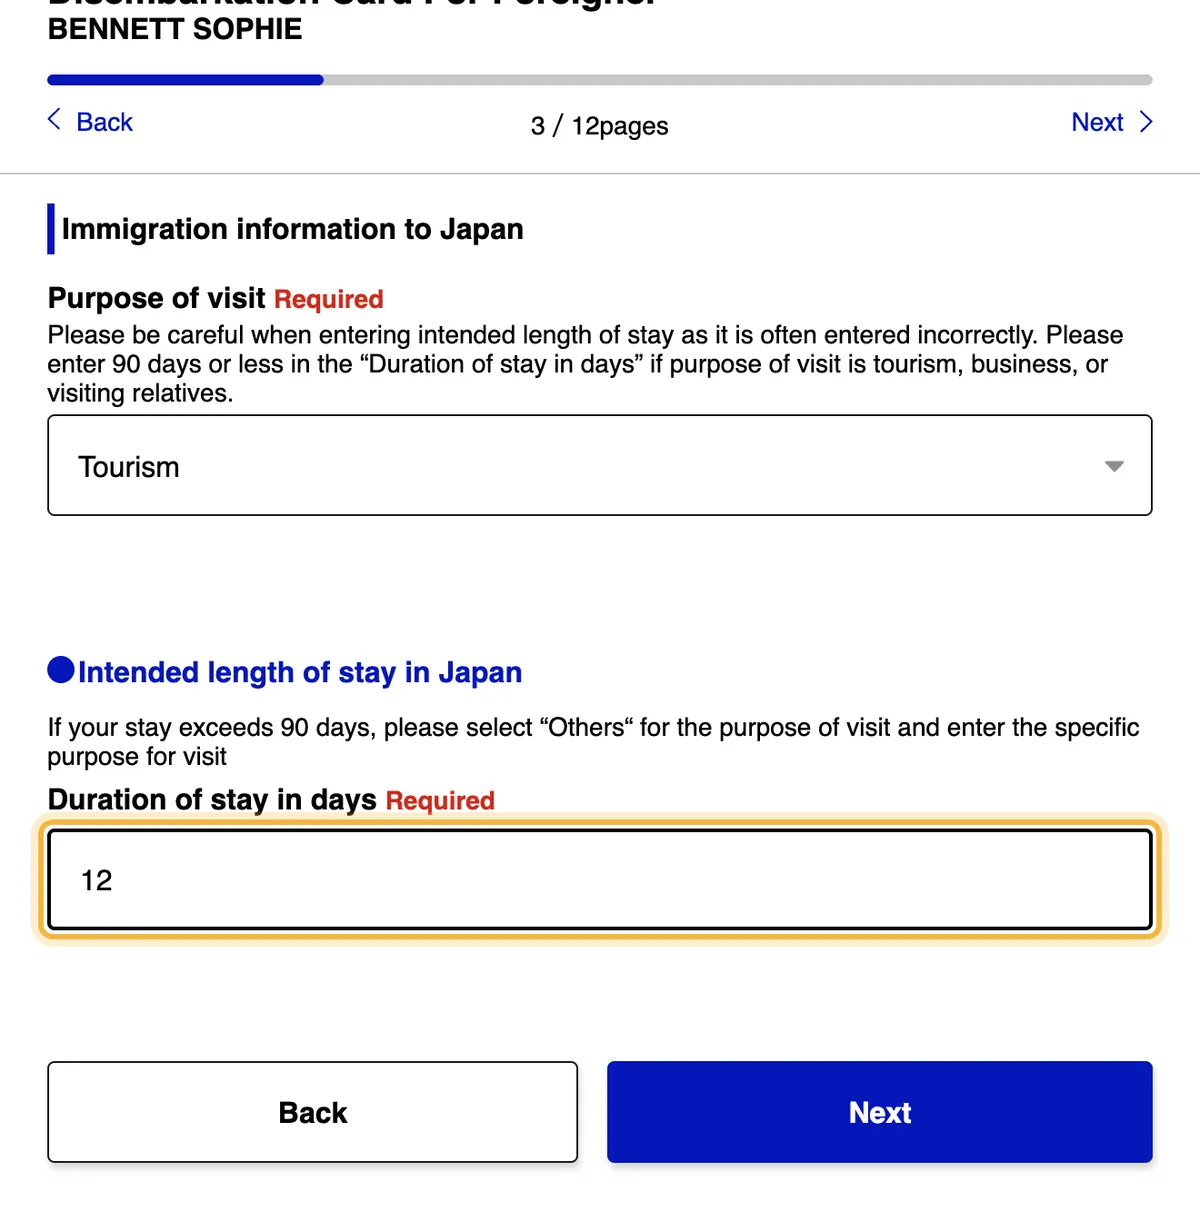
Then choose your purpose of visit (Tourism, Business, Visiting relatives, or Others) and enter the duration of stay in days.
The site warns that people often get this field wrong. It’s a number of days, not a date: for a 12-day trip, type 12. For tourism, business, or visiting relatives, it must be 90 days or less. If your stay is longer, the site asks you to choose Others as the purpose and explain it.
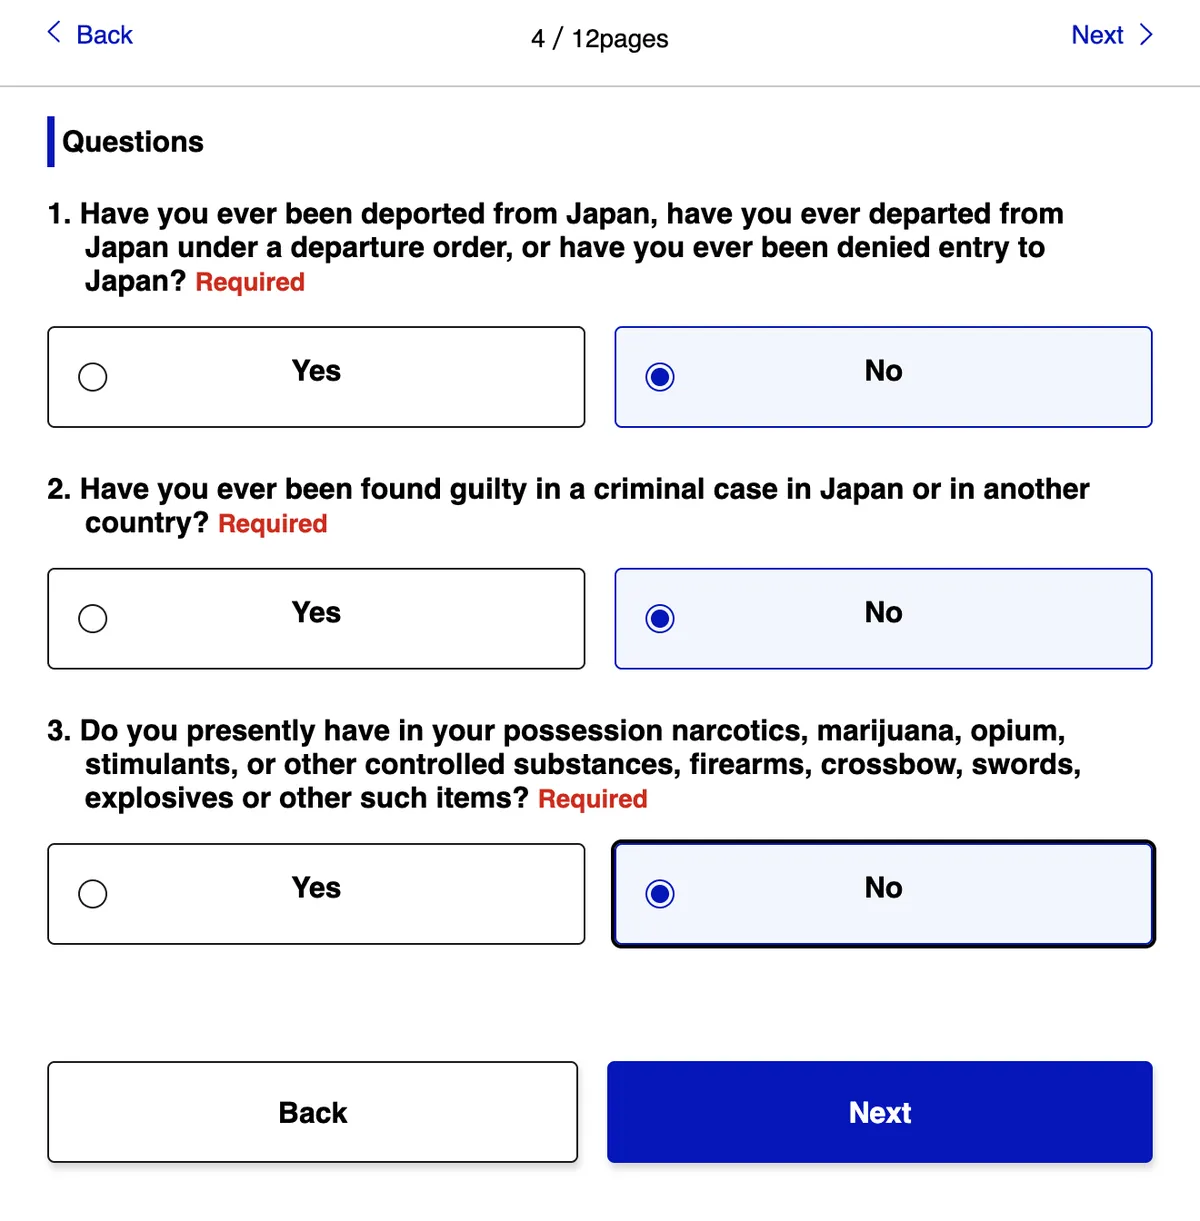
Next come three yes-or-no questions: whether you’ve ever been deported from or denied entry to Japan, whether you’ve been found guilty in a criminal case in Japan or any other country, and whether you’re carrying drugs, firearms, swords, explosives, or similar items. Answer them truthfully.
Step 6: Customs
The customs declaration is five short screens, which ask whether you’re bringing in:
- prohibited items;
- restricted items, such as meat products (including sausage and ham), fruit, plants, or animals;
- gold bullion or gold products;
- goods over the duty-free allowance (see below);
- commercial goods or samples, or anything someone else asked you to bring into Japan.
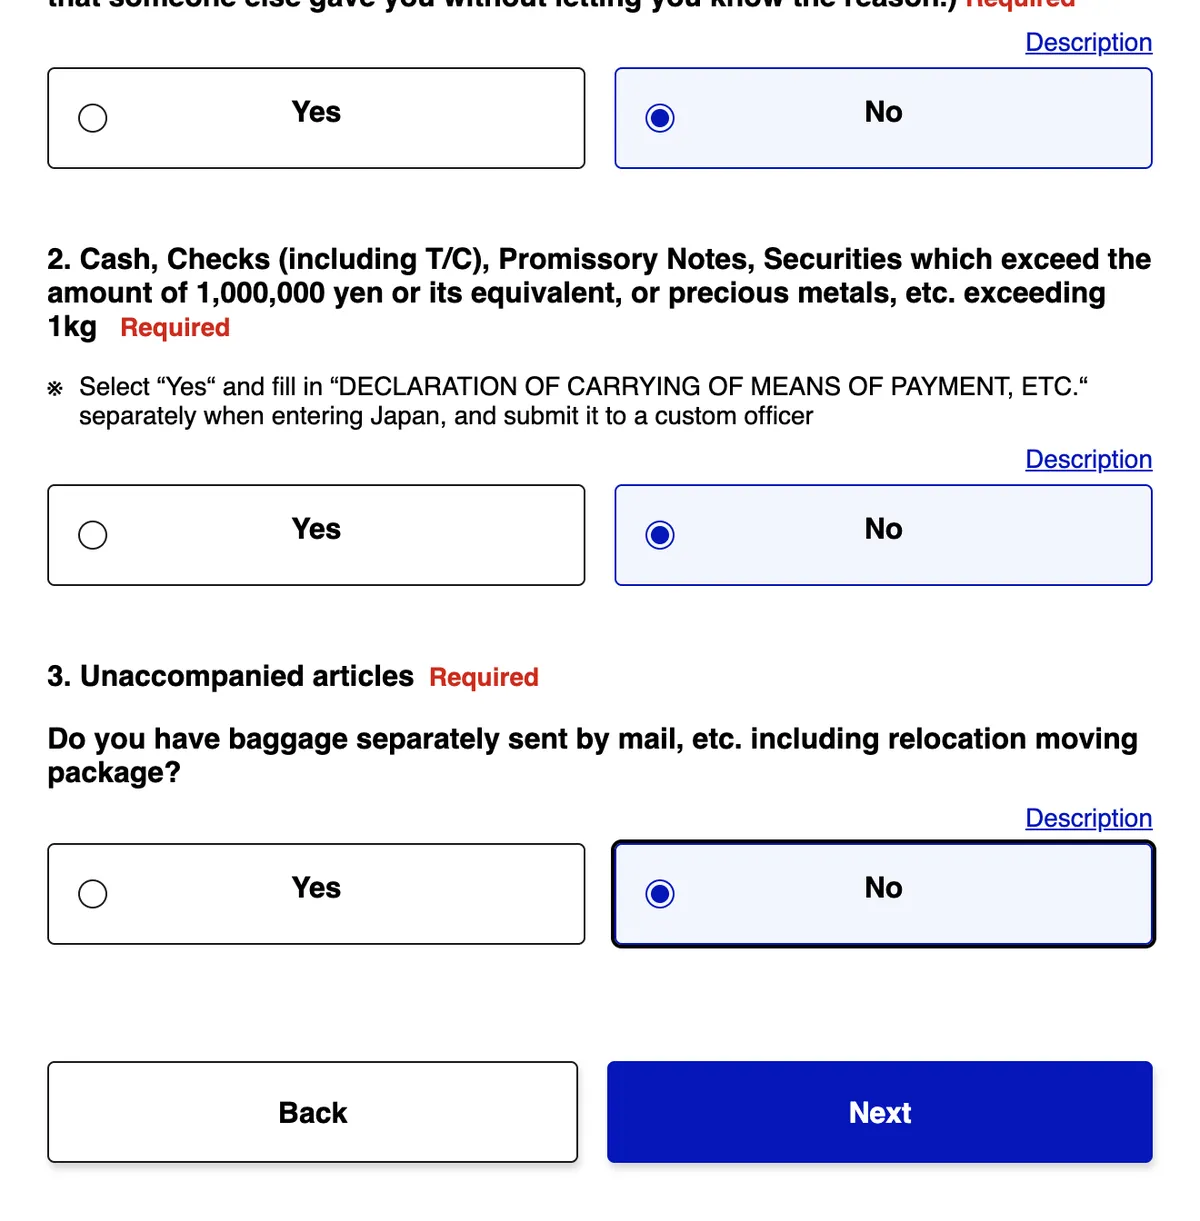
The last screen also asks about cash: if you’re carrying cash, checks, or securities worth more than ¥1,000,000, or precious metals over 1 kg, answer Yes. The site tells you that you also need to fill out a separate paper form, the Declaration of Carrying of Means of Payment, etc., when you arrive and hand it to a customs officer. It also asks about unaccompanied baggage: anything you’ve shipped separately, by mail or through a moving company.
Japan’s duty-free allowance (per adult, according to Japan Customs):
| Item | Allowance |
|---|---|
| Alcohol | 3 bottles (about 760 ml each) |
| Cigarettes | 200 (or 50 cigars; the limits for other tobacco are on the Japan Customs site) |
| Perfume | 2 oz |
| Everything else | Up to ¥200,000 in total, based on overseas market value. Items worth under ¥10,000 each do not count toward the total |
Step 7: Review and get your QR code
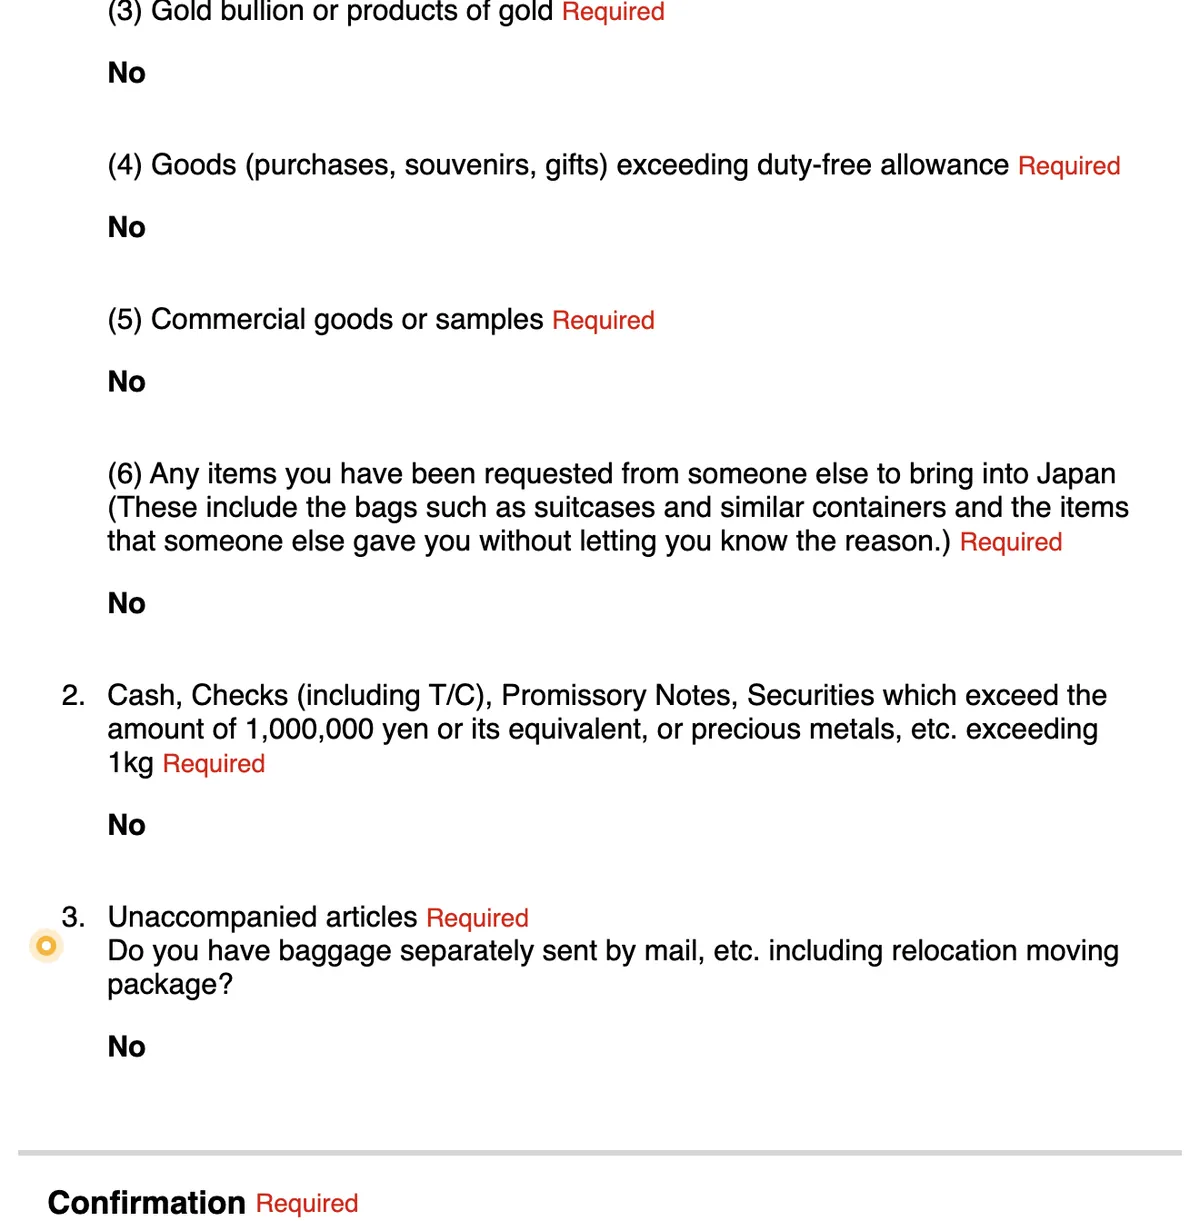
The last page shows everything you entered. Check your passport number and name, your arrival date and flight, and the number of days. If something is wrong, click Edit. At the bottom, check the box The above entry is true and correct and click Register.
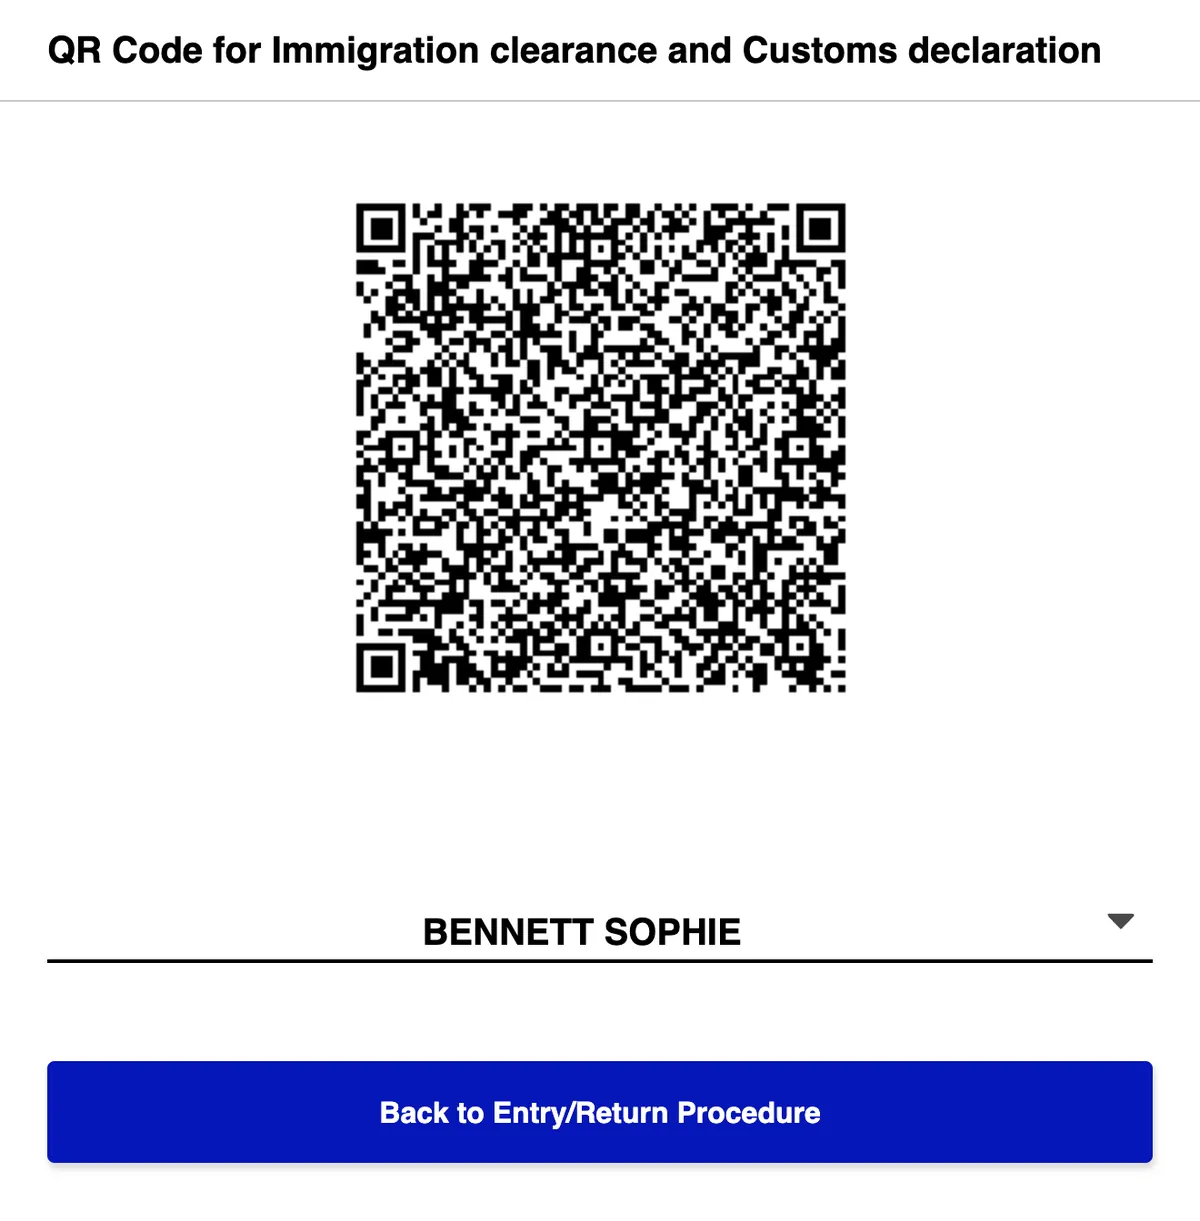
Go back to the procedure page and click Display QR Code. A pop-up explains the procedure: by displaying the code, you confirm that your answers are true. Click Agree and display the QR Code.
At the airport
- Show the QR code at the immigration counter and again at customs (at the electronic declaration terminal or the inspection table). After using the terminal, you can go through the electronic declaration gate.
- A screenshot works. The site says a screenshot of the QR code is also accepted, so take one in case you have no signal when you land. Visit Japan Web also has an offline mode, but you have to log in while you’re online first.
- Changed something? Make a new code. If you edit your details after displaying the QR code, display it again and take a new screenshot.
- One QR code per person. If you registered family members, switch between them in the drop-down menu below the code.
The QR code for tax-free shopping is separate: you register it after you arrive, and the Digital Agency says you can’t use a screenshot of it.
Families and groups
You can register up to 10 family members traveling with you in your account, if they go through immigration at the same time as you. On the home screen, click Details of family members traveling with you and add each person’s passport details, one at a time. Then fill out the immigration and customs section for each of them. Each person gets their own QR code.
How to change or delete your details
- To change your answers, open Immigration clearance and Customs declaration on the procedure page and click Edit. Then display the QR code again.
- To delete your account, click When you want to delete your account on the login page. The Digital Agency says that deleting your account doesn’t delete the information you’ve already submitted to each government agency.
Common mistakes
- Using a copycat site or app that charges a fee. The official one is vjw.digital.go.jp, and it’s free.
- Entering dates month first. Your date of birth and passport expiry go year, month, day.
- Entering the day you leave the U.S. as your arrival date. It’s the day you land in Japan.
- Typing letters in the flight number. Numbers only: NH105 is 105.
- Entering a date as the length of stay. It’s a number of days: 90 or less for tourism.
- Closing the page before you enter the code from the email. The site warns you to keep it open until your account is created.
- Not taking a screenshot of the QR code before you fly.
- Forgetting to make a new QR code after you change something.
Frequently asked questions
What is Visit Japan Web?
It’s the official online service of Japan’s Digital Agency for immigration clearance and customs declarations. You register your information before you arrive and show a QR code at the airport. Foreign visitors can also use it for tax-free shopping during their stay.
Is Visit Japan Web legit?
Yes. It’s run by Japan’s Digital Agency at vjw.digital.go.jp, and it’s free. What isn’t legit are the copycat sites that charge a fee and the look-alike apps the Digital Agency has warned about.
Is Visit Japan Web required in 2026?
No, it’s optional. It makes immigration and customs faster, but you can enter Japan without it.
Is there a Visit Japan Web app?
No. Visit Japan Web is a website: you open it in your phone’s browser. The Digital Agency has warned about suspicious apps with similar names, such as “Visit Japan Web Info.”
Is Visit Japan Web free?
Yes. The Digital Agency says it never asks users to pay any fee.
What is the “point of embarkation” in Visit Japan Web?
It’s the airport where you board your flight to Japan. If you fly nonstop from Los Angeles to Tokyo, it’s Los Angeles. Start typing and pick it from the list.
Do I need Visit Japan Web if I already have a visa for Japan?
It’s optional either way. With a U.S. passport, you don’t need a visa for a short trip, but if you have one (to work or study, for example), Visit Japan Web has a Link VISA option on the trip page.
Can I fill out Visit Japan Web for my kids?
Yes. Add them as family members traveling with you (up to 10), and fill out the immigration and customs section for each of them. Each one gets their own QR code.
Can I use a screenshot of the QR code?
Yes, for immigration and customs: the site says a screenshot is also accepted. If you change anything afterward, take a new one.
What documents do U.S. citizens need to enter Japan?
According to the State Department, your U.S. passport must be valid for your whole stay, and you should have proof of a return or onward ticket. For tourism or business, you don’t need a visa for up to 90 days1. For the full requirements, see Japan visa for U.S. citizens.
Apply yourself or use a visa service? Compare the government fee with what each visa service charges, online or in person, on the Japan visa page.
Sources
Where the information in this guide comes from, with the date we last checked it: official websites for fees and rules, and each visa service’s website or Google Maps listing when we give its prices or reviews. The numbers match the superscript numbers in the text.
- 1.Ministry of Foreign Affairs of Japan: Exemption of visa (short-term stay). mofa.go.jp · checked on October 20, 2026
- 2.Japan’s Digital Agency: Visit Japan Web (official portal). vjw.digital.go.jp · checked on November 17, 2026
- 3.Japan’s Digital Agency: Visit Japan Web, about the service. services.digital.go.jp · checked on November 18, 2026
- 4.Japan’s Digital Agency: How to use Visit Japan Web. services.digital.go.jp · checked on November 18, 2026
- 5.Japan’s Digital Agency: Visit Japan Web user manual (English). vjw.digital.go.jp · checked on November 18, 2026
- 6.Japan’s Digital Agency: Visit Japan Web announcements (fee-charging sites, suspicious apps). services.digital.go.jp · checked on November 18, 2026
- 7.Japan Customs: Procedures of passenger clearance (duty-free allowance, cash declaration). customs.go.jp · checked on November 18, 2026
- 8.U.S. Department of State: Japan Travel Advisory and Country Information. travel.state.gov · checked on November 18, 2026